Royal Board: Difference between revisions
(→Special Panel: corecc spellong) |
Tag: Disambiguation links |
||
| (5 intermediate revisions by 3 users not shown) | |||
| Line 24: | Line 24: | ||
The Royal Board's Special Panel is {{nihongo|'''Bibbidi-Bobbidi-Boo'''|ビビディ・バビディ・ブゥ!|Bibidi Babidi Buu!}}. When activated, the [[Fairy Godmother]] appears, recites the incantation "Bibbidi-Bobbidi-Boo" and imbues a dice with magic. The player then rolls the die and collects an amount of GP, equal to the number on the die multiplied by 200. | The Royal Board's Special Panel is {{nihongo|'''Bibbidi-Bobbidi-Boo'''|ビビディ・バビディ・ブゥ!|Bibidi Babidi Buu!}}. When activated, the [[Fairy Godmother]] appears, recites the incantation "Bibbidi-Bobbidi-Boo" and imbues a dice with magic. The player then rolls the die and collects an amount of GP, equal to the number on the die multiplied by 200. | ||
After Disney Town has been visited, Captain Justice and Captain Dark can also be triggered on the Special Panels at random. | After [[Disney Town]] has been visited, Captain Justice and Captain Dark can also be triggered on the Special Panels at random. | ||
==Layout== | ==Layout== | ||
{| | {|border="1" cellspacing="0" cellpadding="2" style="text-align:center; width:60%" | ||
!colspan="4"|[[File:Royal Board Full Map KHBBS.png|700px]] | |||
|- | |-style="{{style|bbs|a}}" | ||
!style="width:7%"|Key | |||
!style="width:31%"|Normal reward | |||
!style="width:31%"|Limited reward | |||
!style="width:31%"|Mirage Arena reward | |||
|- | |- | ||
|1 | |1 | ||
|[[Stun Edge]] | |[[Stun Edge]] | ||
|[[Wishing Edge]] (Aqua only) | |[[Wishing Edge]] (Aqua only) | ||
|— | |— | ||
|- | |- | ||
|2 | |2 | ||
|[[Focus Barrier]] (Aqua only) | |[[Focus Barrier]] (Aqua only) | ||
|[[Focus Block]] (Terra and Ventus only) | |[[Focus Block]] (Terra and Ventus only) | ||
|— | |— | ||
|- | |- | ||
|3 | |3 | ||
|[[Fire Dash]] | |[[Fire Dash]] | ||
|[[Meteor Shower]] | |[[Meteor Shower]] | ||
|— | |— | ||
|- | |- | ||
|4 | |4 | ||
|[[Fire]] (60%) / [[Thunder]] (40%) | |[[Fire]] (60%) / [[Thunder]] (40%) | ||
|— | |— | ||
|— | |— | ||
|- | |- | ||
|5 | |5 | ||
|[[Bind]] (40%) / [[Stop]] (40%) / | |[[Bind]] (40%) / [[Stop]] (40%) / [[Blackout]] (20%) | ||
|— | |— | ||
|— | |— | ||
|} | |} | ||
==Opponent command cards== | ==Opponent command cards== | ||
{| | {{tab|o-center}} | ||
| | {{tab|Cinderella (Casual Wear)}} | ||
{|border=1 cellpadding=2 cellspacing=0 style="text-align:center; width:500px" | |||
|-style="{{style|bbs|a}}" | |||
{|border=1 cellpadding=2 cellspacing=0 | !style="width:100px"|Type | ||
|- | !Command | ||
!Lv | |||
!Quantity | |||
|- | |||
!rowspan="6"|Attack | |||
|- | |||
|[[Barrier Surge]]<ref name="V">In Ventus' scenario, this command is only used when playing in the Mirage Arena.</ref> | |[[Barrier Surge]]<ref name="V">In Ventus' scenario, this command is only used when playing in the Mirage Arena.</ref> | ||
|1 | |1 | ||
|4 | |4 | ||
|- | |- | ||
|rowspan="2"|[[Wishing Edge]]<ref name="V"/> | |rowspan="2"|[[Wishing Edge]]<ref name="V"/> | ||
|1 | |1 | ||
|3 | |3 | ||
|- | |- | ||
|2 | |2 | ||
|1 | |1 | ||
|- | |- | ||
|rowspan="2"|[[Stun Edge]] | |rowspan="2"|[[Stun Edge]] | ||
|1 | |1 | ||
|2 | |2 | ||
|- | |- | ||
|2 | |2 | ||
|2 | |2 | ||
|- | |- | ||
|[[Confusion Strike]] | |[[Confusion Strike]] | ||
|1 | |1 | ||
|4 | |4 | ||
|- | |- | ||
!rowspan="12"|Magic | |||
|[[Blizzard]] | |[[Blizzard]] | ||
|1 | |1 | ||
|4 | |4 | ||
|- | |- | ||
|rowspan="2"|[[Thunder]] | |rowspan="2"|[[Thunder]] | ||
|1 | |1 | ||
|3 | |3 | ||
|- | |- | ||
|2 | |2 | ||
|1 | |1 | ||
|- | |- | ||
|[[Zero Gravity]] | |[[Zero Gravity]] | ||
|1 | |1 | ||
|4 | |4 | ||
|- | |- | ||
|rowspan="2"|[[Magnet]] | |rowspan="2"|[[Magnet]] | ||
|1 | |1 | ||
|2 | |2 | ||
|- | |- | ||
|2 | |2 | ||
|2 | |2 | ||
|- | |- | ||
|rowspan="2"|[[Aero]] | |rowspan="2"|[[Aero]] | ||
|1 | |1 | ||
|2 | |2 | ||
|- | |- | ||
|2 | |2 | ||
|2 | |2 | ||
|- | |- | ||
|rowspan="2"|[[Bind]] | |rowspan="2"|[[Bind]] | ||
|1 | |1 | ||
|2 | |2 | ||
|- | |- | ||
|2 | |2 | ||
|2 | |2 | ||
|- | |- | ||
|rowspan="2"|[[Stop]] | |rowspan="2"|[[Stop]] | ||
|1 | |1 | ||
|3 | |3 | ||
|- | |- | ||
|2 | |2 | ||
|1 | |1 | ||
|- | |- | ||
!rowspan="4"|Other | |||
|rowspan="2"|[[Focus Block]]<ref name="A">In Aqua's scenario, this command is only used when playing in the Mirage Arena.</ref> | |rowspan="2"|[[Focus Block]]<ref name="A">In Aqua's scenario, this command is only used when playing in the Mirage Arena.</ref> | ||
|1 | |1 | ||
|3 | |3 | ||
|- | |- | ||
|2 | |2 | ||
|1 | |1 | ||
|- | |- | ||
|rowspan="2"|[[Focus Barrier]]<ref name="V"/> | |rowspan="2"|[[Focus Barrier]]<ref name="V"/> | ||
|1 | |1 | ||
|2 | |2 | ||
|- | |- | ||
|2 | |2 | ||
|2 | |2 | ||
|} | |} | ||
{{tab|c}}{{tab|Cinderella (Dress)}} | |||
{|border=1 cellpadding=2 cellspacing=0 | {|border=1 cellpadding=2 cellspacing=0 style="text-align:center; width:500px" | ||
|- | |-style="{{style|bbs|a}}" | ||
!style="width:100px"|Type | |||
!Command | |||
!Lv | |||
!Quantity | |||
|- | |- | ||
!rowspan="6"|Attack | |||
|[[Barrier Surge]]<ref name="T">This command is only used when playing in the Mirage Arena.</ref> | |[[Barrier Surge]]<ref name="T">This command is only used when playing in the Mirage Arena.</ref> | ||
|1 | |1 | ||
|4 | |4 | ||
|- | |- | ||
|rowspan="2"|[[Wishing Edge]]<ref name="T"/> | |rowspan="2"|[[Wishing Edge]]<ref name="T"/> | ||
|1 | |1 | ||
|3 | |3 | ||
|- | |- | ||
|2 | |2 | ||
|1 | |1 | ||
|- | |- | ||
|rowspan="2"|[[Stun Edge]] | |rowspan="2"|[[Stun Edge]] | ||
|1 | |1 | ||
|2 | |2 | ||
|- | |- | ||
|2 | |2 | ||
|2 | |2 | ||
|- | |- | ||
|[[Confusion Strike]] | |[[Confusion Strike]] | ||
|1 | |1 | ||
|4 | |4 | ||
|- | |- | ||
!rowspan="12"|Magic | |||
|[[Blizzard]] | |[[Blizzard]] | ||
|1 | |1 | ||
|4 | |4 | ||
|- | |- | ||
|rowspan="2"|[[Thunder]] | |rowspan="2"|[[Thunder]] | ||
|1 | |1 | ||
|3 | |3 | ||
|- | |- | ||
|2 | |2 | ||
|1 | |1 | ||
|- | |- | ||
|rowspan="2"|[[Zero Gravity]] | |rowspan="2"|[[Zero Gravity]] | ||
|1 | |1 | ||
|3 | |3 | ||
|- | |- | ||
|2 | |2 | ||
|1 | |1 | ||
|- | |- | ||
|[[Magnet]] | |[[Magnet]] | ||
|1 | |1 | ||
|2 | |2 | ||
|- | |- | ||
|rowspan="2"|[[Aero]] | |rowspan="2"|[[Aero]] | ||
|1 | |1 | ||
|2 | |2 | ||
|- | |- | ||
|2 | |2 | ||
|2 | |2 | ||
|- | |- | ||
|rowspan="2"|[[Bind]] | |rowspan="2"|[[Bind]] | ||
|1 | |1 | ||
|3 | |3 | ||
|- | |- | ||
|2 | |2 | ||
|1 | |1 | ||
|- | |- | ||
|rowspan="2"|[[Stop]] | |rowspan="2"|[[Stop]] | ||
|1 | |1 | ||
|3 | |3 | ||
|- | |- | ||
|2 | |2 | ||
|1 | |1 | ||
|- | |- | ||
!rowspan="4"|Other | |||
|rowspan="2"|[[Focus Block]] | |rowspan="2"|[[Focus Block]] | ||
|1 | |1 | ||
|3 | |3 | ||
|- | |- | ||
|2 | |2 | ||
|1 | |1 | ||
|- | |- | ||
|rowspan="2"|[[Focus Barrier]]<ref name="T"/> | |rowspan="2"|[[Focus Barrier]]<ref name="T"/> | ||
|1 | |1 | ||
|3 | |3 | ||
|- | |- | ||
|2 | |2 | ||
|1 | |1 | ||
|} | |} | ||
{{tab|c}}{{tab|c}} | |||
|} | |||
==Strategy== | ==Strategy== | ||
| Line 270: | Line 264: | ||
==Notes and references== | ==Notes and references== | ||
{{reflist}} | {{reflist}} | ||
{{Minigames}} | |||
[[Category:Kingdom Hearts Birth by Sleep Command Boards]] | [[Category:Kingdom Hearts Birth by Sleep Command Boards]] | ||
Latest revision as of 17:07, 18 May 2023
| Royal Board | |
|---|---|
 The perfect fit, if you're looking to play against Cinderella. | |
| Japanese | ロイヤルボード |
| Rōmaji | Roiyaru Bōdo |
| World | Castle of Dreams |
| Opponents | Cinderella (Casual Wear)[2] Cinderella (Dress)[1] |
| Unlocked | |
| Complete Castle of Dreams. | |
| Stats | |
|---|---|
| GP Goals | 6000 14000 22000 |
| Starting GP | 1000 |
| Checkpoint panel GP reward |
350 |
| GP Up panel | |
| Initial rate | 2% |
| Increase | 4% |
| MAX rate | 10% |
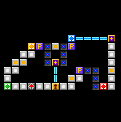
The Royal Board is a Command Board in Kingdom Hearts Birth by Sleep. It is shaped like a glass slipper.
Special Panel[edit]
The Royal Board's Special Panel is Bibbidi-Bobbidi-Boo (ビビディ・バビディ・ブゥ! Bibidi Babidi Buu!). When activated, the Fairy Godmother appears, recites the incantation "Bibbidi-Bobbidi-Boo" and imbues a dice with magic. The player then rolls the die and collects an amount of GP, equal to the number on the die multiplied by 200.
After Disney Town has been visited, Captain Justice and Captain Dark can also be triggered on the Special Panels at random.
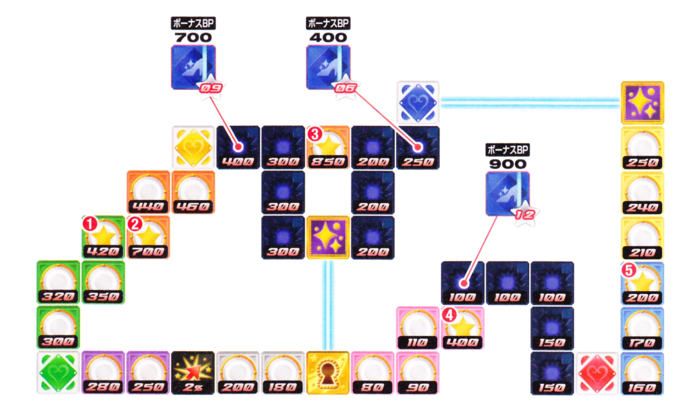
Layout[edit]

| |||
|---|---|---|---|
| Key | Normal reward | Limited reward | Mirage Arena reward |
| 1 | Stun Edge | Wishing Edge (Aqua only) | — |
| 2 | Focus Barrier (Aqua only) | Focus Block (Terra and Ventus only) | — |
| 3 | Fire Dash | Meteor Shower | — |
| 4 | Fire (60%) / Thunder (40%) | — | — |
| 5 | Bind (40%) / Stop (40%) / Blackout (20%) | — | — |
Opponent command cards[edit]
| Type | Command | Lv | Quantity |
|---|---|---|---|
| Attack | Barrier Surge[3] | 1 | 4 |
| Wishing Edge[3] | 1 | 3 | |
| 2 | 1 | ||
| Stun Edge | 1 | 2 | |
| 2 | 2 | ||
| Confusion Strike | 1 | 4 | |
| Magic | Blizzard | 1 | 4 |
| Thunder | 1 | 3 | |
| 2 | 1 | ||
| Zero Gravity | 1 | 4 | |
| Magnet | 1 | 2 | |
| 2 | 2 | ||
| Aero | 1 | 2 | |
| 2 | 2 | ||
| Bind | 1 | 2 | |
| 2 | 2 | ||
| Stop | 1 | 3 | |
| 2 | 1 | ||
| Other | Focus Block[4] | 1 | 3 |
| 2 | 1 | ||
| Focus Barrier[3] | 1 | 2 | |
| 2 | 2 |
| Type | Command | Lv | Quantity |
|---|---|---|---|
| Attack | Barrier Surge[5] | 1 | 4 |
| Wishing Edge[5] | 1 | 3 | |
| 2 | 1 | ||
| Stun Edge | 1 | 2 | |
| 2 | 2 | ||
| Confusion Strike | 1 | 4 | |
| Magic | Blizzard | 1 | 4 |
| Thunder | 1 | 3 | |
| 2 | 1 | ||
| Zero Gravity | 1 | 3 | |
| 2 | 1 | ||
| Magnet | 1 | 2 | |
| Aero | 1 | 2 | |
| 2 | 2 | ||
| Bind | 1 | 3 | |
| 2 | 1 | ||
| Stop | 1 | 3 | |
| 2 | 1 | ||
| Other | Focus Block | 1 | 3 |
| 2 | 1 | ||
| Focus Barrier[5] | 1 | 3 | |
| 2 | 1 |
Strategy[edit]
There are two optional routes, that are recommended, to choose from on this board:
With the first, the player may choose to head right and ride the Prize Cube to the red Check Panel. Following that, they should head straight up and pass the blue Check Panel. Depending on the number they roll from that point, they may either take the shortest route to the yellow Check Panel, or land on the Special Panel. After passing the yellow Check Panel, they must head downwards to the green Check Panel, and to the starting point immediately afterwards.
The other option is the player chooses to head left and pass the green Check Panel. Following that, they must head upwards and pass the yellow Check Panel. Depending on the number they roll from that point, the player may either take the shortest route to the blue Check Panel, or land on the Special Panel. After passing the yellow Check Panel, the player must head downwards to the red Check Panel, and to the starting point immediately afterwards. If the player is not confident in passing through the Damage Panels after the red Check Panel, the Two Dice hand may prove useful.
Deciding which route to take depends on the number the player rolls, as well as whether the Prize Cubes have been used.
Bear in mind that Cinderella will use Joker's Fortune when she has the opportunity.
Gallery[edit]
Notes and references[edit]
- ^ Only available in Terra's scenario.
- ^ Only available in Ventus and Aqua's scenarios.
- ^ a b c In Ventus' scenario, this command is only used when playing in the Mirage Arena.
- ^ In Aqua's scenario, this command is only used when playing in the Mirage Arena.
- ^ a b c This command is only used when playing in the Mirage Arena.

