Demon Tide
| Demon Tide | |||||||||||||||||||||
|---|---|---|---|---|---|---|---|---|---|---|---|---|---|---|---|---|---|---|---|---|---|
|
| |||||||||||||||||||||
| Japanese | デビルズウェーブ | ||||||||||||||||||||
| Rōmaji | Debiruzu Wēbu | ||||||||||||||||||||
| Translation | Devil's Wave
| ||||||||||||||||||||
| Type | Pureblood Heartless | ||||||||||||||||||||
| Games | Kingdom Hearts 0.2 Birth by Sleep -A fragmentary passage- Kingdom Hearts Union χ Kingdom Hearts III Kingdom Hearts Dark Road | ||||||||||||||||||||
| |||||||||||||||||||||
| |||||||||||||||||||||


| Demon Tide
|
|---|
| Kingdom Hearts III |
| A dark swarm of Shadows, gathered into a massive, seething cloud. The fact that its foul ilk has been seen not just in the realm of darkness but in the realm of light is surely a harbinger of some coming evil. |
| Location | HP | Strength | Defense | EXP | |||||||
| Homecoming | 5500 | 57 | 31 | 0 | |||||||
| Physical | Fire | Blizzard | Thunder | ||||||||
| ×1.0[1]/×0.2[2] | ×1.0[1]/×0.5[2] | ×1.0[1]/×0.5[2] | ×1.0 | ||||||||
| Water | Dark | Neutral | Rapid-fire | ||||||||
| ×1.0[1]/×0.5[2] | ×1.0[1]/×0.5[2] | ×1.0[1]/×0.2[2] | ×0.4 | ||||||||
| Freeze | Electrify | Stun | |||||||||
| ✕ | ✕ | ✕ | |||||||||
| Revenge Value | Damage Limit | ||||||||||
| — | 24 | ||||||||||
| World(s) | |||||||||||
| Dark World | |||||||||||
| Location | HP | Strength | Defense | EXP | |||||||
| Twilight Town | 4000 | 25 | 12 | 0 | |||||||
| Keyblade Graveyard | 4000 | 59 | 30 | 0 | |||||||
| Physical | Fire | Blizzard | Thunder | Water | |||||||
| ×1.0[1]/×0.5[2] | ×1.0[1]/×0.5[2] | ×1.0[1]/×0.5[2] | ×1.0 | ×1.0[1]/×0.5[2] | |||||||
| Aero | Dark | Neutral | Rapid-fire | ||||||||
| ×1.0[1]/×0.5[2] | ×1.0[1]/×0.5[2] | ×1.0[1]/×0.2[2][3]/×0.5[2][4] | ×0.4 | ||||||||
| Freeze | Electrify | Stun | Hunny | ||||||||
| ✕ | ✕ | ✕ | ✕ | ||||||||
| Reaction Endurance |
Revenge Value |
Attraction Magnification |
Damage Limit | ||||||||
| — | — | ×0.5 | 24
| ||||||||
| Rewards | |||||||||||
| Sora: Cure, MP Safety (Twilight Town) Curaga, Starlight (Keyblade Graveyard) | |||||||||||
| World(s) | |||||||||||
| Twilight Town, Keyblade Graveyard | |||||||||||
| World | Rank | LV | BP | |||
| Scala ad Caelum | Face A Tough Enemy | 85 | 10000 | |||
| Physical | Magic | |||||
| Normal | Normal | |||||
| Non-element | Fire | Water | ||||
| Normal | Normal | Normal | ||||
| Lightning | Wind | Light | Darkness | |||
| Normal | Weak | Weak | Normal | |||
| Poison | Sleep | Paralysis | Blind | |||
| Normal | Normal | Normal | Normal | |||
| Attack | Physical | |||||
| Stats | — | |||||
| Bonus | — | |||||
| Passive Effects | ||||||
| Defeat 1 | Defense +10 | |||||
| Defeat 1 | Magic Resist +10 | |||||
| Defeat 1 | Magic +10 | |||||
| Defeat 1 | Strength +10 | |||||
| Floor | Time Period | LV | BP | ||
| 100 | 3 | 85 | 10000 | ||
| 100 | 4 | 87 | 10000 | ||
| 100 | 5 | 90 | 10000 | ||
| 1: 01/25/21 – 02/07/21 2: 02/15/21 – 02/28/21 3: 03/08/21 – 03/21/21 4: 03/28/21 – 04/11/21 5: 04/19/21 – 04/25/21 | |||||
| Physical | Magic | ||||
| Normal | Normal | ||||
| Non-element | Fire | Water | |||
| Normal | Normal | Normal | |||
| Lightning | Wind | Light | Darkness | ||
| Normal | Weak | Weak | Normal | ||
| Poison | Sleep | Paralysis | Blind | ||
| Normal | Normal | Normal | Normal | ||
| Attack | Physical | ||||
| Stats | — | ||||
| Bonus | — | ||||
| Passive Effects | |||||
| Defeat 1 | Defense +10 | ||||
| Defeat 1 | Magic Resist +10 | ||||
| Defeat 1 | Magic +10 | ||||
| Defeat 1 | Strength +10 | ||||
The Demon Tide is a Pureblood Heartless introduced in Kingdom Hearts 0.2 Birth by Sleep -A fragmentary passage-. It is a mass of Shadows in a wave-like formation.
Story[edit]
Kingdom Hearts 0.2 Birth by Sleep -A fragmentary passage-[edit]
The Demon Tide attacks Aqua and King Mickey when they arrive at the remains of Destiny Islands and investigate the door inside the Secret Place. It is defeated by the two Keyblade Masters, but returns to hunt Riku shortly after they find the Kingdom Key D behind the door. Aqua and King Mickey rush to Riku's aid, and Aqua attempts to restrain the Demon Tide with chains of light. The Heartless breaks free, and it drags Aqua back to the remains of Destiny Islands, destroying Mickey's shirt in the process. As Mickey helps Sora and Riku seal the Door to Darkness, Aqua battles the Demon Tide and promises to help anyone else who falls into the Realm of Darkness.
Kingdom Hearts III[edit]
Shortly after their arrival in Twilight Town, Sora, Donald, and Goofy, they spot a Demon Tide chasing Hayner, Pence and Olette. Sora, Donald, and Goofy fight against it, but the Heartless retreats before it could be vanquished.
After Terra-Xehanort is repelled by Donald's Zettaflare at the Keyblade Graveyard, a massive Demon Tide appears and swallows King Mickey, Kairi, Donald, Goofy, Ventus, Aqua and Lea, scattering them throughout the worlds for the Lich to take their hearts. Riku attempts to fight back against the Heartless to rescue their friends, but both he and Sora are swallowed as well. However, thanks to Kairi, Sora ends up in The Final World, where Chirithy helps restore him. Using the power of waking, Sora is able to save his friends and return to the moment Terra-Xehanort attempted them. When the Lingering Will repels Terra-Xehanort, Dark Riku and Xigbar take his place and summon a horde of Heartless and Nobodies as a final test for the guardians of light. Unfortunately, a new Demon Tide appears and goes berserk, swallowing up the rest of the Heartless and Nobodies to strengthen itself. Sora charges bravely into battle, being contacted by the spirit of Ephemer, who assists him by summoning the Keyblades in the graveyard to help fight back the Demon Tide. With the power of the Unions, Sora is able to reach the core of the Demon Tide and destroy the Heartless.
Design[edit]
The Demon Tide is a massive swarm of Shadows that travels in waves and has a core that glows violet or orange. It initially appears as a large wave of Shadows, but when it takes enough damage, it plunges this wave into the ground, turning the entire area in shades of red and black before re-emerging as a tornado of Shadows with an orange core at its center.
When the Demon Tide takes damage, individual Shadows will fall out of the swarm and disappear. Many of its attacks also comprise of launching individual Shadows, which disappear after impact.
Strategy[edit]
Kingdom Hearts 0.2 Birth by Sleep -A fragmentary passage-[edit]
The Demon Tide is the final boss of Kingdom Hearts 0.2 Birth by Sleep -A fragmentary passage-. As such, it is resilient. Aqua should be sure to have many items equipped before she faces this Heartless.
This boss initially has access to three attacks: a soaring strike, a Shadow trap, and an assault from underground. Each of these can be avoided with a well-timed Barrier, and a quick Counter Blast can then be used to damage the boss. Aqua can tell when the Demon Tide is about to attack by watching the eyes of the Shadows that comprise it: when the eyes glow red, it means the boss is about to strike. Aqua should avoid the Demon Tide in these instances and use a combination of physical attacks and magic to harm it in the interim. After a certain amount of damage is dealt, Mickey will ride on top of the Demon Tide, and the Wayfinder Situation Command becomes available. During the time it is available, the Demon Tide won't be able to attack, allowing Aqua to get in some easy hits. Using the Wayfinder Situation Command allows Aqua to immobilize the Demon Tide, giving the opportunity to attack all-out, quickly depleting its HP.
After a certain amount of damage, the Demon Tide starts its second phase, becoming much more aggressive in an attempt to protect its vulnerable core. Added to its arsenal is a new projectile attack that is best avoided with Cartwheel. It switches between this and a another attack, in which its tornado of Shadows glows red and rushes Aqua. During this attack it retreats every now and then, giving Aqua the ability to use Barrier again. If Aqua stands too close to the edge of the map, it might not retreat far enough. In this case the attack is continuous. While the tornado is blue-purple, it's safe to attack. When its health gets even lower, the Demon Tide warps away its core while its tornado remains. After this, invulnerable orbs made of Shadows will be launched from the ground at random. If this happens, Aqua should Cartwheel around as much as possible to dodge these. If she is hit, the orbs will launch her into the sky, where she is a risk of being hit again by other orbs. These can be avoided with Air Slide, although this becomes more difficult as Aqua falls towards the ground. At the end of the attack, the tornado increases in size and whirls around the entire arena, limiting Aqua's movements. When the Demon Tide is not using any of these attacks, Aqua should enter the tornado and bombard the Demon Tide with aerial combos until its HP is fully depleted.
An easy strategy is to take advantage of the fact the Demon Tide can't attack when the Wayfinder Situation Command is available and used. When the command becomes available, attack the Demon Tide with regular attacks and Magic until the timer almost runs out, then activate Wayfinder. When the Demon Tide is immobilized, attack it with Magic, Grand Magic, and Shotlocks (an Elixir or Megalixir can be used to refill the Focus Gauge) until the Finish command almost runs out, then activate it. By the time the finisher is used, the Demon Tide can be down to 1 HP bar or less (The Demon Tide cannot be defeated before the second phase starts). Once the Demon Tide breaks free, it will immediately trigger the second phase. If its HP is low enough, it can be finished quickly with a couple of Firaga spells, or another Shotlock.
Kingdom Hearts III[edit]
The Demon Tide starts off vulnerable to attack but only for a couple of seconds until it goes into its initial attack. The Demon Tide can't be stunned and its next attack cannot be prevented. Its initial attack can either be flinging Shadows at Sora, charging at Sora three times, or diving into the ground and coming up from beneath Sora.
If it is flinging Shadows, dodge roll around it. If it dives underground, dodge roll just before it reemerges. If it charges then use Guard and a Reprisal to attack. However, guarding on the third charge can leave Sora open for its next attack. Once you have dodged all three, the Demon Tide will leave itself open for attacks, but will reenter its attack phase after it receives a few combos.
During its flying mode, any part of it can be damaged, but only the very front can be locked on.
During the battle in Twilight Town, the battle will end after 15% of its HP (approximately three bars) has been depleted.
During the battle in the Keyblade Graveyard, once the Demon Tide is reduced to 50% of its HP it takes the form of a tornado with its core floating in the center. When the tornado begins glowing red the Demon Tide will unleash an attack, then return to its normal color after attacking. After using its Devil Meteor attack, the tornado around the core temporarily disappears and does nothing for 25 seconds. For dealing with its tornado mode attacks, wait and block its charges when it uses Devil Screw, Dodge Roll away when it uses Devil Meteor, and dodge with Glide when it uses Devil Barrage.
After the Demon Tide has been defeated at the Keyblade Graveyard, a special sequence is entered in which a new Demon Tide appears and Sora rides upon a mass of Keyblades while flying towards it. Enemies will repeatedly fly at Sora, however they can be eliminated by firing lights with ![]() . Large projectiles cannot be destroyed and must be dodged to avoid damage. After damaging the Demon Tide with 300 lights, the Situation Command Union χ appears and will end the battle when used.
. Large projectiles cannot be destroyed and must be dodged to avoid damage. After damaging the Demon Tide with 300 lights, the Situation Command Union χ appears and will end the battle when used.
| Technique | Element | Status | Power | Block? | Repel LV | |
|---|---|---|---|---|---|---|
| Devil Screw (デビルスクリュー Debiru Sukuryū) |
Dark | — | 1.5 per hit | △ | 2 | |
| Flies around at high speed while its core spins; it does this 2–3 times, crashing into opponents in its path. Only used in Flying Mode. | ||||||
| Devil Fall (デビルフォール Debiru Fōru) |
Dark | — | 2.0 per hit | △ | 2 | |
| Circles in the air, then dives underground and resurfaces several times, forming an arc and attacking as it does so. Only used in Flying Mode. | ||||||
| Devil Avalanche (デビルアバランチ Debiru Abaranchi) |
Physical | — | 0.4 per hit | △ | 2 | |
| Fires many Shadows forward like projectiles; they vanish after travelling a certain distance or hitting an opponent. Only used in the Keyblade Graveyard battle and while in Flying Mode. | ||||||
| Devil Tornado (デビルトルネード Debiru Torunēdo) |
Dark | — | 1.5 per hit | △ | — | |
| Moves around while spinning at high speed, crashing into opponents in its path 2–3 times. Only used while in Tornado Mode. | ||||||
| Devil Barrage (デビルバラージュ Debiru Barāju) |
Physical | — | 0.4 per hit | △ | — | |
| Rapidly fires many Shadows as projectiles. Only used while in Tornado Mode. | ||||||
| Devil Meteor (デビルメテオ Debiru Meteo) |
Physical | — | 1.5 per hit | △ | 2 | |
| Makes the core go underground and launches a series of huge projectiles into the air. Blows opponents high into the air after a few seconds during the attack. Only used while in Tornado mode.
| ||||||
| The Demon Tide transitions from Flying mode to Tornado mode when at lower than 50% HP. The Deadly Blow EZ Code can only reduce its HP to 1 until it transitions. | ||||||
| Guard/Block: △ = Can be blocked; O = Can be blocked and interrupted (melee) or deflected back (projectile); X = Cannot be blocked. | ||||||
Videos[edit]
| Demon Tide – Kingdom Hearts 0.2 BbS | |
|---|---|
| Demon Tide I – Kingdom Hearts III | Demon Tide II – Kingdom Hearts III |
Gallery[edit]
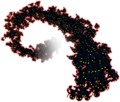
The Demon Tide as it appears soaring through the sky.
