Mushroom XIII: Difference between revisions
ShardofTruth (talk | contribs) mNo edit summary |
(Adding the exact locations of 2, 5, and 7) |
||
| Line 54: | Line 54: | ||
:''Dodge its shots to earn points! Aim for even higher points by reflecting its shots!'' | :''Dodge its shots to earn points! Aim for even higher points by reflecting its shots!'' | ||
'''No. 2''' is in [[Christmas Town]]. You must dodge or block its projectiles until your score reaches 80. [[Final Form]] is highly useful for No. 2, since almost every action made in Final Form also guards Sora from external attacks, and the projectiles can be blocked. | '''No. 2''' is in [[Christmas Town]], where you fought [[The Experiment]]. You must dodge or block its projectiles until your score reaches 80. [[Final Form]] is highly useful for No. 2, since almost every action made in Final Form also guards Sora from external attacks, and the projectiles can be blocked. | ||
Like Xigbar, it shoots projectiles that must be deflected. | Like Xigbar, it shoots projectiles that must be deflected. | ||
| Line 87: | Line 87: | ||
:''Bash it hard and don't lose to how quickly it heals itself.'' | :''Bash it hard and don't lose to how quickly it heals itself.'' | ||
'''No. 5''' is in the [[Cave of Wonders]]. Many would say that this is probably the easiest one to beat. You must defeat it in 10 seconds, although its health regenerates quickly. | '''No. 5''' is in the [[Cave of Wonders]], at the Treasure Room. Many would say that this is probably the easiest one to beat. You must defeat it in 10 seconds, although its health regenerates quickly. | ||
For its fast attacks, [[Master Form]] is best used when defeating No. 5, as this gives it less recovery time. [[Limit Form|Limit Form's]] Zantetsuken ground combo finisher is also extremely helpful, as it can easily chop away an entire bar of the Mushroom's health. Another strategy is to use Final Form, equip Fire Boost and Bond of Flame, and keep attacking with Firaga. | For its fast attacks, [[Master Form]] is best used when defeating No. 5, as this gives it less recovery time. [[Limit Form|Limit Form's]] Zantetsuken ground combo finisher is also extremely helpful, as it can easily chop away an entire bar of the Mushroom's health. Another strategy is to use Final Form, equip Fire Boost and Bond of Flame, and keep attacking with Firaga. | ||
| Line 110: | Line 110: | ||
:''Approaching it will cause it to knock you away. Attack it from a distance using magic to defeat it.'' | :''Approaching it will cause it to knock you away. Attack it from a distance using magic to defeat it.'' | ||
'''No. 7''' is in [[Twilight Town]]. You must defeat it in 10 seconds. However, coming in contact with the Mushroom will send a character flying. This trait is similar to the Berserk state of [[Saïx]]. | '''No. 7''' is in [[Twilight Town]], within the Tunnelway. You must defeat it in 10 seconds. However, coming in contact with the Mushroom will send a character flying. This trait is similar to the Berserk state of [[Saïx]]. | ||
The key to taking No. 7 out is by using long-range attacks. Wisdom Form works well, though the player will have to keep gliding away from No. 7. Alternatively, you may use Limit Form's Sonic Blade, Strike Raid and Ragnarok combos to keep it at bay. Final Form and Reflega is another extremely effective method. | The key to taking No. 7 out is by using long-range attacks. Wisdom Form works well, though the player will have to keep gliding away from No. 7. Alternatively, you may use Limit Form's Sonic Blade, Strike Raid and Ragnarok combos to keep it at bay. Final Form and Reflega is another extremely effective method. | ||
Revision as of 20:40, 14 August 2012
Yes, the untapped power that lies within you. Now, child, it's time you awakened that power and realized your full potential.
| ||
| This article needs more information!
Improve it by adding what you know about the following issues. | ||
Template:Enemy The Mushroom XIII are a group of thirteen Mushroom Heartless that wear Black Coats which appear in Kingdom Hearts II Final Mix. Like all Mushroom Heartless, they each require special treatment in order to be properly satisfied. The mini-games required to defeat them are recorded in Jiminy's Journal.
Once defeated, a Mushroom will drop one of the Tranquil materials, which are designed after the Mushroom XIII. In addition, the six odd Mushrooms will drop shields for Goofy, while the six even Mushrooms will drop staves for Donald Duck. Fulfilling the highest requirement for each Mushroom will also reward the player with the Premium Mushroom for the odd Mushrooms and the Limited Mushroom for the even Mushrooms. Unlike the others, the thirteenth Mushroom drops not a shield or a staff, but the Winner's Proof Keyblade and a Tranquil Proof.
Design
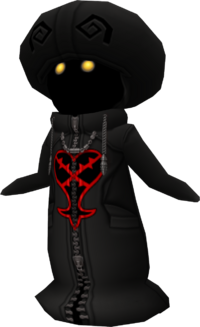
All of the Mushroom XIII Heartless share a common appearance. They all sport the same spherical, pitch-black heads and glowing eyes, and they all wear black coats reminiscent of those worn by Organization XIII. These coats are black and sport similar zippers, pull-strings, and hoods—the latter of which resembles a mushroom cap and has two angular, black spirals decorating it. The Heartless emblem is displayed on the front of all of their coats. The members of the Mushroom XIII only differ in two regards; the numbers on their backs and their size. Each Mushroom XIII member has a different silver Roman numeral from I to XIII on their backs, representing their rank. The members' sizes can vary greatly. No. V is the largest and is larger than Sora, while No. VIII is the smallest, and is roughly half of Sora's height.
The Mushroom XIII's collective name reflects their mushroom-like shape and their resemblance to Organization XIII.
List of members
No. 1
- A Heartless that moves quickly and deals sharp attacks. It's the strongest of its group.
- Hit it to get points! Time it so if it uses Reversal, you can use Reversal yourself to make a big opening!
No. 1 appears at Memory's Skyscraper after Xemnas is defeated. In order to defeat it, you must hit it 70 times within 30 seconds. In order to get the Premium Mushroom, you must hit it 99 times.
Like Xemnas, this Heartless has the "Reversal" reaction, and its large size is a reference to Xemnas' role as the leader of Organization XIII. It is also fought in the same area as Xemnas. It is recommended to use Wisdom Form to defeat No.1, since it has quick attacks, and you can land at least three hits with the Shoot function. Final Form is very useful too. With one jump and an attack you can land 9 hits.
No. 2
- An aggressive Heartless that spreads shots of magic in succession.
- Dodge its shots to earn points! Aim for even higher points by reflecting its shots!
No. 2 is in Christmas Town, where you fought The Experiment. You must dodge or block its projectiles until your score reaches 80. Final Form is highly useful for No. 2, since almost every action made in Final Form also guards Sora from external attacks, and the projectiles can be blocked.
Like Xigbar, it shoots projectiles that must be deflected.
No. 3
- A clumsy Heartless that drops valuable prizes here and there.
- Pursue it to pick up its prizes. Because it's rushing, it'll occasionally drop lots of prizes.
No. 3 is in Beast's Castle, where you fought Xaldin. You must have defeated Xaldin to reach it. You must collect 450 of the prizes it drops before time runs out.
The prizes may reference the opportunities for Sora to use the Learn and Jump commands from Xaldin in his boss fight. The location of the mini-game also references Xaldin.
No. 4
- A Heartless that enjoys chasing Sora. Enjoys playing tag.
- It will continue to summon allies to chase Sora. Don't get caught in its attacks and defeat them one by one.
No. 4 is in the Land of Dragons, outside of the Palace. You must have defeated Shan-Yu to reach No. 4. You must hit 85 of the clones without getting hit once. A recommended strategy is to hit the first batch of clones normally, and then use Final Form to fly around and ram into the clones with the spinning Keyblades or using Thundaga with the Photon Debugger equipped. The Form may run out near the end of the duel, when the clones are stronger, so the player should keep a distance and use Thundaga to kill the last few clones and reach 85.
Its cloning trait references Vexen's ability to create Replicas while avoiding being hit, which is reminiscent of the Chilly Academic's cowardice.
No. 5
- A tough Heartless that restores health when sleeping.
- Bash it hard and don't lose to how quickly it heals itself.
No. 5 is in the Cave of Wonders, at the Treasure Room. Many would say that this is probably the easiest one to beat. You must defeat it in 10 seconds, although its health regenerates quickly. For its fast attacks, Master Form is best used when defeating No. 5, as this gives it less recovery time. Limit Form's Zantetsuken ground combo finisher is also extremely helpful, as it can easily chop away an entire bar of the Mushroom's health. Another strategy is to use Final Form, equip Fire Boost and Bond of Flame, and keep attacking with Firaga.
Its regenerating health is similar to the Power Meter of the Lexaeus Absent Silhouette battle. It is also the largest of the Mushrooms, narrowly exceeding No.1, also referencing Lexaeus' size compared to the other Organization members.
No. 6
- A Heartless that summons doppelgangers and has them attack using different formations.
- Tell one formation from another and defeat this one quickly!
No. 6 is in the Underworld, where you fought Demyx. You must defeat all of the clones within 45 seconds. The clones appear in groups of six.
The clones are reminiscent of the boss battle against Zexion in the Reverse/Rebirth mode of Kingdom Hearts Re:Chain of Memories.
No. 7
- A very dangerous Heartless that's always raging.
- Approaching it will cause it to knock you away. Attack it from a distance using magic to defeat it.
No. 7 is in Twilight Town, within the Tunnelway. You must defeat it in 10 seconds. However, coming in contact with the Mushroom will send a character flying. This trait is similar to the Berserk state of Saïx.
The key to taking No. 7 out is by using long-range attacks. Wisdom Form works well, though the player will have to keep gliding away from No. 7. Alternatively, you may use Limit Form's Sonic Blade, Strike Raid and Ragnarok combos to keep it at bay. Final Form and Reflega is another extremely effective method.
No. 8
- A Heartless that sits on the ground, waiting to be pulled right out.
- If pulled out, continue attacking it. Don't let it touch the ground!
No. 8 is in Twilight Town, outside Yen Sid's Tower. Many say that this is the hardest challenge: bouncing the mushrooms around like a ping-pong ball 85 times, similar to the Rare Truffle in the first game. A way to make this easier is to equip Berserk Combo, repeatedly press Thundaga until MP runs out, then keep hitting it over and over. When MP is refilled, repeatedly press Thundaga again. Make sure to remove all MP Haste abilities.
It is similar to the Overtake/Clear Light Reaction Command in Axel's boss fight in the 6th Day of the Prologue.
No. 9
- A Heartless that will start spinning if hit. Enjoys dancing.
- Attack it relentlessly to keep it from stopping.
No. 9 is in Radiant Garden, where you fought Demyx. You must hit it 75 times without letting it stop spinning. A recommended strategy is to use the Fatal Crest Keyblade, Berserk Charge and Retaliating Slash, which could land up to 99 hits.
The Mushroom's spinning, or dancing, is a reference to Demyx's association with music and control of Dancer Nobodies. Also, it is the location where the Melodious Nocturne met his end.
No. 10
- Summons frauds to attack Sora.
- If you find the real one, attack it at once.
No. 10 is in Port Royal (Isla de Muerta) during the 2nd Time. You must defeat the real Mushroom in 55 seconds as it shuffles itself amongst four clones.
Finding the real one amongst fakes references Luxord's boss battle and the shuffling of cards.
The fighting style of No. 10 resembles that of the Black Ballade in Kingdom Hearts Final Mix, where hitting the wrong one would result in Sora taking damage.
No. 11
- A Heartless that's being bugged by numbers pursuing it.
- Attack it to lower the number. The key is to make it 0 as quickly as possible.
No. 11 is in Timeless River, in the waterway. You must deplete the hit counter above its head in 19 seconds.
The hit counter resembles the one Marluxia uses against Sora in his Absent Silhouette battle. The best way to defeat it is by using Wisdom Form, combined with the Fenrir Keyblade, Negative Combo and taking off all Combo Plus abilities.
No. 12
- Warps to various locations and ridicules Sora.
- Use long ranged magic attacks or lock on to it in order to defeat it.
No. 12 is in Twilight Town, outside the Old Mansion. You must defeat all of the clones before time runs out. However, unlike No. 6, they appear by themselves in rapid succession.
The clones' rapid appearance reference Larxene's Absent Silhouette battle.
No. 13
- A mysterious Heartless that appeared with a divine light.
- After seeing proof that the rest of its group had been defeated, it entrusted to Sora a treasure spoken of for generations.
No. 13 is in the Great Maw in Radiant Garden (where you fought the 1000 Heartless.) You must have beaten all of the other Mushrooms to reach the last Mushroom Heartless. You also gain a crown.
Its non-hostility compared to the other twelve references Roxas as being unusual compared to the rest of the Organization. Also, it comes down to you with a beam of light, a possible reference to Roxas's element of light.
Trivia
- All of the Mushrooms have similar traits to the members of Organization XIII. Some of the locations where the Mushrooms are fought also reference where the Organization members were fought.
- Wisdom Form is very useful for some of the minigames, such as No. 1 and No. 4, and to a certain extent, No. 7. The minigames were likely engineered so that Wisdom Form would be made much more useful than in the original Kingdom Hearts II.
- When you enter the Great Maw, all of the Mushrooms (save for No. 13) will appear. Then, after a short period of time, all of the Mushrooms will warp away; however, the ones you have completed the Jiminy Objectives for will stay and jump up and down.

