Prize Pod: Difference between revisions
Coldasfire (talk | contribs) |
KrytenKoro (talk | contribs) |
||
| Line 115: | Line 115: | ||
|-bgcolor="#E6E6FA" | |-bgcolor="#E6E6FA" | ||
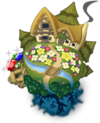
|rowspan=3|<span id="Dwarf Woodlands"></span>[[File:Dwarf Woodlands KHBBS.png|100px|link=Dwarf Woodlands]] | |rowspan=3|<span id="Dwarf Woodlands"></span>[[File:Dwarf Woodlands KHBBS.png|100px|link=Dwarf Woodlands]] | ||
|[[File:DL Sprite Terra Icon | |[[File:DL Sprite Terra Icon 1 KHBBS.png|40px]] | ||
|'''Underground Waterway''' | |'''Underground Waterway''' | ||
|Spawn point on top of a waterfall near the exit to the '''Courtyard'''. If none appear, exit the area and come back. Repeat if necessary. | |Spawn point on top of a waterfall near the exit to the '''Courtyard'''. If none appear, exit the area and come back. Repeat if necessary. | ||
| Line 126: | Line 126: | ||
*[[Peach Fantasy]] | *[[Peach Fantasy]] | ||
|-bgcolor="#E6E6FA" | |-bgcolor="#E6E6FA" | ||
|[[File:DL Sprite Ventus Icon | |[[File:DL Sprite Ventus Icon 1 KHBBS.png|40px]] | ||
|'''The Mine''' | |'''The Mine''' | ||
|Lit area far on the right. Defeat the [[Monotrucker]]s and [[Red Hot Chili]]s. | |Lit area far on the right. Defeat the [[Monotrucker]]s and [[Red Hot Chili]]s. | ||
|-bgcolor="#E6E6FA" | |-bgcolor="#E6E6FA" | ||
|[[File:DL Sprite Aqua Icon | |[[File:DL Sprite Aqua Icon 1 KHBBS.png|40px]] | ||
|'''Flower Glade''' | |'''Flower Glade''' | ||
|Area to the left of the path from the '''Courtyard'''. | |Area to the left of the path from the '''Courtyard'''. | ||
|-bgcolor="#E6E6FA" | |-bgcolor="#E6E6FA" | ||
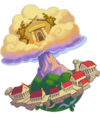
|rowspan=3|<span id="Enchanted Dominion"></span>[[File:Enchanted Dominion KHBBS.png|100px|link=Enchanted Dominion]] | |rowspan=3|<span id="Enchanted Dominion"></span>[[File:Enchanted Dominion KHBBS.png|100px|link=Enchanted Dominion]] | ||
|[[File:DL Sprite Terra Icon | |[[File:DL Sprite Terra Icon 1 KHBBS.png|40px]] | ||
|'''Waterside''' | |'''Waterside''' | ||
|Make sure only four [[Scrapper]]s appear at the first spawn point. The Prize Pods will appear near the wall of fire. If none appear, exit the area and come back. Repeat if necessary. | |Make sure only four [[Scrapper]]s appear at the first spawn point. The Prize Pods will appear near the wall of fire. If none appear, exit the area and come back. Repeat if necessary. | ||
| Line 146: | Line 146: | ||
*[[Sky Blue Mousse]] | *[[Sky Blue Mousse]] | ||
|-bgcolor="#E6E6FA" | |-bgcolor="#E6E6FA" | ||
|[[File:DL Sprite Ventus Icon | |[[File:DL Sprite Ventus Icon 1 KHBBS.png|40px]] | ||
|'''Audience Chamber''' | |'''Audience Chamber''' | ||
|Columned area to the left of the entrance. If Red Hot Chilis appear, leave the area and return. Repeat if needed. | |Columned area to the left of the entrance. If Red Hot Chilis appear, leave the area and return. Repeat if needed. | ||
|-bgcolor="#E6E6FA" | |-bgcolor="#E6E6FA" | ||
|[[File:DL Sprite Aqua Icon | |[[File:DL Sprite Aqua Icon 1 KHBBS.png|40px]] | ||
|'''Waterside''' | |'''Waterside''' | ||
|After exiting the Forest Clearing, in the corner of the cliff on the left side. | |After exiting the Forest Clearing, in the corner of the cliff on the left side. | ||
|-bgcolor="#E6E6FA" | |-bgcolor="#E6E6FA" | ||
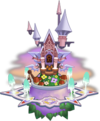
|rowspan=3|<span id="Castle of Dreams"></span>[[File:Castle of Dreams KHBBS.png|100px|link=Castle of Dreams]] | |rowspan=3|<span id="Castle of Dreams"></span>[[File:Castle of Dreams KHBBS.png|100px|link=Castle of Dreams]] | ||
|[[File:DL Sprite Terra Icon | |[[File:DL Sprite Terra Icon 1 KHBBS.png|40px]] | ||
|'''Palace Courtyard''' | |'''Palace Courtyard''' | ||
|Go over to the fountain in the center and defeat four [[Red Hot Chili]]s. If another four appear, exit the area and come back. Repeat if necessary. | |Go over to the fountain in the center and defeat four [[Red Hot Chili]]s. If another four appear, exit the area and come back. Repeat if necessary. | ||
| Line 166: | Line 166: | ||
*[[Wedding Cake]] | *[[Wedding Cake]] | ||
|-bgcolor="#E6E6FA" | |-bgcolor="#E6E6FA" | ||
|[[File:DL Sprite Ventus Icon | |[[File:DL Sprite Ventus Icon 1 KHBBS.png|40px]] | ||
|'''Mousehole''' | |'''Mousehole''' | ||
|Far end of the area accessible through the hole on top of the end table with a clock in the '''Wardrobe Room'''. If the Prize Pods do not appear, leave the area and return. Repeat if needed. | |Far end of the area accessible through the hole on top of the end table with a clock in the '''Wardrobe Room'''. If the Prize Pods do not appear, leave the area and return. Repeat if needed. | ||
|-bgcolor="#E6E6FA" | |-bgcolor="#E6E6FA" | ||
|[[File:DL Sprite Aqua Icon | |[[File:DL Sprite Aqua Icon 1 KHBBS.png|40px]] | ||
|'''Foyer''' | |'''Foyer''' | ||
|Underneath the stairs on the left side. If you don't encounter a single [[Bruiser]] beforehand, reenter the area until it appears. | |Underneath the stairs on the left side. If you don't encounter a single [[Bruiser]] beforehand, reenter the area until it appears. | ||
|-bgcolor="#E6E6FA" | |-bgcolor="#E6E6FA" | ||
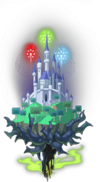
|<span id="Radiant Garden"></span>[[File:Radiant Garden KHBBS.png|100px|link=Radiant Garden]] | |<span id="Radiant Garden"></span>[[File:Radiant Garden KHBBS.png|100px|link=Radiant Garden]] | ||
|[[File:DL Sprite Terra Icon | |[[File:DL Sprite Terra Icon 1 KHBBS.png|40px]]<br />[[File:DL Sprite Ventus Icon 1 KHBBS.png|40px]]<br />[[File:DL Sprite Aqua Icon 1 KHBBS.png|40px]] | ||
|'''Fountain Court''' | |'''Fountain Court''' | ||
|Defeat four [[Blue Sea Salt]]s in the recess adjacent to the stairs. If Red Hot Chilis appear instead, leave the area and come back. Repeat if necessary. | |Defeat four [[Blue Sea Salt]]s in the recess adjacent to the stairs. If Red Hot Chilis appear instead, leave the area and come back. Repeat if necessary. | ||
| Line 185: | Line 185: | ||
|-bgcolor="#E6E6FA" | |-bgcolor="#E6E6FA" | ||
|rowspan=3|<span id="Disney Town"></span>[[File:Disney Town KHBBS.png|100px|link=Disney Town]] | |rowspan=3|<span id="Disney Town"></span>[[File:Disney Town KHBBS.png|100px|link=Disney Town]] | ||
|[[File:DL Sprite Terra Icon | |[[File:DL Sprite Terra Icon 1 KHBBS.png|40px]] | ||
|'''Raceway''' | |'''Raceway''' | ||
|Defeat four Blue Sea Salts in the blue walled roof across from the exit to '''Pete's Rec Room''', only accessible via Air Sliding. If a [[Chrono Twister]] appears, leave the area and come back. Repeat if necessary. | |Defeat four Blue Sea Salts in the blue walled roof across from the exit to '''Pete's Rec Room''', only accessible via Air Sliding. If a [[Chrono Twister]] appears, leave the area and come back. Repeat if necessary. | ||
| Line 193: | Line 193: | ||
*[[Toonbasco]] | *[[Toonbasco]] | ||
|-bgcolor="#E6E6FA" | |-bgcolor="#E6E6FA" | ||
|[[File:DL Sprite Ventus Icon | |[[File:DL Sprite Ventus Icon 1 KHBBS.png|40px]] | ||
|'''Raceway''' | |'''Raceway''' | ||
|Roof leading from the exit to '''Pete's Rec Room'''. Defeat four [[Blue Sea Salt]]s. If none appear, leave the area and come back. Repeat if necessary. | |Roof leading from the exit to '''Pete's Rec Room'''. Defeat four [[Blue Sea Salt]]s. If none appear, leave the area and come back. Repeat if necessary. | ||
|-bgcolor="#E6E6FA" | |-bgcolor="#E6E6FA" | ||
|[[File:DL Sprite Aqua Icon | |[[File:DL Sprite Aqua Icon 1 KHBBS.png|40px]] | ||
|'''Raceway''' | |'''Raceway''' | ||
|After exiting the Raceway Registration, immediately to your left against the wall with the hidden Mickeys. Must defeat a few [[Blue Sea Salt]]s beforehand. | |After exiting the Raceway Registration, immediately to your left against the wall with the hidden Mickeys. Must defeat a few [[Blue Sea Salt]]s beforehand. | ||
|-bgcolor="#E6E6FA" | |-bgcolor="#E6E6FA" | ||
|<span id="Olympus Coliseum"></span>[[File:Olympus Coliseum KHBBS.png|100px|link=Olympus Coliseum]] | |<span id="Olympus Coliseum"></span>[[File:Olympus Coliseum KHBBS.png|100px|link=Olympus Coliseum]] | ||
|[[File:DL Sprite Terra Icon | |[[File:DL Sprite Terra Icon 1 KHBBS.png|40px]]<br />[[File:DL Sprite Ventus Icon 1 KHBBS.png|40px]]<br />[[File:DL Sprite Aqua Icon 1 KHBBS.png|40px]] | ||
|'''Town Near Thebes''' | |'''Town Near Thebes''' | ||
|Far left corner. If only Red Hot Chilis appear, or none appear at all, leave the area and come back until Red Hot Chilis and Prize Pots appear together. Repeat if necessary. | |Far left corner. If only Red Hot Chilis appear, or none appear at all, leave the area and come back until Red Hot Chilis and Prize Pots appear together. Repeat if necessary. | ||
| Line 212: | Line 212: | ||
|-bgcolor="#E6E6FA" | |-bgcolor="#E6E6FA" | ||
|rowspan=3|<span id="Deep Space"></span>[[File:Deep Space KHBBS.png|100px|link=Deep Space]] | |rowspan=3|<span id="Deep Space"></span>[[File:Deep Space KHBBS.png|100px|link=Deep Space]] | ||
|[[File:DL Sprite Terra Icon | |[[File:DL Sprite Terra Icon 1 KHBBS.png|40px]] | ||
|'''Turo Prison Hold''' | |'''Turo Prison Hold''' | ||
|Far end of the area. If none appear, leave the area and come back. Repeat if necessary. | |Far end of the area. If none appear, leave the area and come back. Repeat if necessary. | ||
| Line 223: | Line 223: | ||
*[[Star Syrup]] | *[[Star Syrup]] | ||
|-bgcolor="#E6E6FA" | |-bgcolor="#E6E6FA" | ||
|[[File:DL Sprite Ventus Icon | |[[File:DL Sprite Ventus Icon 1 KHBBS.png|40px]] | ||
|'''Durgon Transporter''' | |'''Durgon Transporter''' | ||
|In the airlock leading to the '''Ship Exterior'''. Defeat the first wave of enemies that appear in the room, after which the Prize Pods will appear. If a second wave of enemies appears instead, exit and re-enter the room and try again. | |In the airlock leading to the '''Ship Exterior'''. Defeat the first wave of enemies that appear in the room, after which the Prize Pods will appear. If a second wave of enemies appears instead, exit and re-enter the room and try again. | ||
|-bgcolor="#E6E6FA" | |-bgcolor="#E6E6FA" | ||
|[[File:DL Sprite Aqua Icon | |[[File:DL Sprite Aqua Icon 1 KHBBS.png|40px]] | ||
|'''Turo Prison Block''' | |'''Turo Prison Block''' | ||
|Far end of the hall. | |Far end of the hall. | ||
|-bgcolor="#E6E6FA" | |-bgcolor="#E6E6FA" | ||
|rowspan=3|<span id="Neverland"></span>[[File:Neverland KHBBS.png|100px|link=Neverland]] | |rowspan=3|<span id="Neverland"></span>[[File:Neverland KHBBS.png|100px|link=Neverland]] | ||
|[[File:DL Sprite Terra Icon | |[[File:DL Sprite Terra Icon 1 KHBBS.png|40px]] | ||
|'''Skull Rock: Entrance''' | |'''Skull Rock: Entrance''' | ||
|Small cliff accessible via Air Slide from '''Skull Rock: Cavern'''. If [[Jellyshade]]s and a [[Triple Wrecker]] appear, leave the area and come back. Repeat if necessary. | |Small cliff accessible via Air Slide from '''Skull Rock: Cavern'''. If [[Jellyshade]]s and a [[Triple Wrecker]] appear, leave the area and come back. Repeat if necessary. | ||
| Line 243: | Line 243: | ||
*[[Whipped Dream]] | *[[Whipped Dream]] | ||
|-bgcolor="#E6E6FA" | |-bgcolor="#E6E6FA" | ||
|[[File:DL Sprite Ventus Icon | |[[File:DL Sprite Ventus Icon 1 KHBBS.png|40px]] | ||
|'''Mermaid Lagoon''' | |'''Mermaid Lagoon''' | ||
|On the ledge accessible from the Cliff Path. A Wild Bruiser will appear alone first, followed by the Prize Pods and four Yellow Mustards. If the Wild Bruiser and Yellow Mustards appear together, exit the area and re-enter. | |On the ledge accessible from the Cliff Path. A Wild Bruiser will appear alone first, followed by the Prize Pods and four Yellow Mustards. If the Wild Bruiser and Yellow Mustards appear together, exit the area and re-enter. | ||
|-bgcolor="#E6E6FA" | |-bgcolor="#E6E6FA" | ||
|[[File:DL Sprite Aqua Icon | |[[File:DL Sprite Aqua Icon 1 KHBBS.png|40px]] | ||
|'''Indian Camp''' | |'''Indian Camp''' | ||
|Far end of the area. Appears alongside a Wild Bruiser. | |Far end of the area. Appears alongside a Wild Bruiser. | ||
|-bgcolor="#E6E6FA" | |-bgcolor="#E6E6FA" | ||
|rowspan=2|<span id="Mirage Arena"></span>[[File:Mirage Arena KHBBS.png|100px|link=Mirage Arena]] | |rowspan=2|<span id="Mirage Arena"></span>[[File:Mirage Arena KHBBS.png|100px|link=Mirage Arena]] | ||
|rowspan=2|[[File:DL Sprite Terra Icon | |rowspan=2|[[File:DL Sprite Terra Icon 1 KHBBS.png|40px]]<br />[[File:DL Sprite Ventus Icon 1 KHBBS.png|40px]]<br />[[File:DL Sprite Aqua Icon 1 KHBBS.png|40px]] | ||
|'''Risky Riches''' | |'''Risky Riches''' | ||
|The Prize Pots appear in the second-to-last wave of Round Three; eight appear this time. | |The Prize Pots appear in the second-to-last wave of Round Three; eight appear this time. | ||
Revision as of 00:54, 10 November 2012
Yes, the untapped power that lies within you. Now, child, it's time you awakened that power and realized your full potential.
| ||
 |
This article needs more information!
Improve it by adding what you know about the following issues. | |
Template:Enemy The Prize Pod is an Unversed that is found in Kingdom Hearts Birth by Sleep. Although it is a variant of the Red Hot Chili, Blue Sea Salt, and Yellow Mustard Unversed, it is passive in nature, and is similar to the Mushroom Heartless from earlier games. Prize Pods appear in most worlds, and have conditions that must be met for them to appear, ranging from defeating the enemies in an area to simple random chance. Each time a Prize Pod is damaged, it will drop one of a specific set of Ingredients, depending on which world it is found in, and if not slain in a set amount of time, it will flee. Once a world's set of Prize Pods flee or are slain, they will not reappear until the character has left the world and returned.
Design
A Prize Pod is a small Unversed that resembles a pot or jar. Its lower half is dark purple and decorated by several small, violet diamonds. Its upper half is violet. Its lid is black and sports two small wings that it uses to fly. Its red eyes are set in a happy expression.
In Kingdom Hearts Birth by Sleep Final Mix, the Prize Pod receives a palette swap which gives it a dark-green body with a black base decorated with gold diamonds and gold highlights. Its top is now gold.
The Prize Pod's behavior and tendency to relinquish rare treasures are reminiscent of and likely based of the Bulky Vendor and Prize Bug.
Locations
Kingdom Hearts Birth by Sleep
| World | Char | Location | Spawn Trigger | Ingredient Drop |
|
File:DL Sprite Terra Icon 1 KHBBS.png | Underground Waterway | Spawn point on top of a waterfall near the exit to the Courtyard. If none appear, exit the area and come back. Repeat if necessary. | |
| File:DL Sprite Ventus Icon 1 KHBBS.png | The Mine | Lit area far on the right. Defeat the Monotruckers and Red Hot Chilis. | ||
| File:DL Sprite Aqua Icon 1 KHBBS.png | Flower Glade | Area to the left of the path from the Courtyard. | ||
|
File:DL Sprite Terra Icon 1 KHBBS.png | Waterside | Make sure only four Scrappers appear at the first spawn point. The Prize Pods will appear near the wall of fire. If none appear, exit the area and come back. Repeat if necessary. | |
| File:DL Sprite Ventus Icon 1 KHBBS.png | Audience Chamber | Columned area to the left of the entrance. If Red Hot Chilis appear, leave the area and return. Repeat if needed. | ||
| File:DL Sprite Aqua Icon 1 KHBBS.png | Waterside | After exiting the Forest Clearing, in the corner of the cliff on the left side. | ||

|
File:DL Sprite Terra Icon 1 KHBBS.png | Palace Courtyard | Go over to the fountain in the center and defeat four Red Hot Chilis. If another four appear, exit the area and come back. Repeat if necessary. | |
| File:DL Sprite Ventus Icon 1 KHBBS.png | Mousehole | Far end of the area accessible through the hole on top of the end table with a clock in the Wardrobe Room. If the Prize Pods do not appear, leave the area and return. Repeat if needed. | ||
| File:DL Sprite Aqua Icon 1 KHBBS.png | Foyer | Underneath the stairs on the left side. If you don't encounter a single Bruiser beforehand, reenter the area until it appears. | ||
|
File:DL Sprite Terra Icon 1 KHBBS.png File:DL Sprite Ventus Icon 1 KHBBS.png File:DL Sprite Aqua Icon 1 KHBBS.png |
Fountain Court | Defeat four Blue Sea Salts in the recess adjacent to the stairs. If Red Hot Chilis appear instead, leave the area and come back. Repeat if necessary. | |

|
File:DL Sprite Terra Icon 1 KHBBS.png | Raceway | Defeat four Blue Sea Salts in the blue walled roof across from the exit to Pete's Rec Room, only accessible via Air Sliding. If a Chrono Twister appears, leave the area and come back. Repeat if necessary. | |
| File:DL Sprite Ventus Icon 1 KHBBS.png | Raceway | Roof leading from the exit to Pete's Rec Room. Defeat four Blue Sea Salts. If none appear, leave the area and come back. Repeat if necessary. | ||
| File:DL Sprite Aqua Icon 1 KHBBS.png | Raceway | After exiting the Raceway Registration, immediately to your left against the wall with the hidden Mickeys. Must defeat a few Blue Sea Salts beforehand. | ||
|
File:DL Sprite Terra Icon 1 KHBBS.png File:DL Sprite Ventus Icon 1 KHBBS.png File:DL Sprite Aqua Icon 1 KHBBS.png |
Town Near Thebes | Far left corner. If only Red Hot Chilis appear, or none appear at all, leave the area and come back until Red Hot Chilis and Prize Pots appear together. Repeat if necessary. | |
|
File:DL Sprite Terra Icon 1 KHBBS.png | Turo Prison Hold | Far end of the area. If none appear, leave the area and come back. Repeat if necessary. | |
| File:DL Sprite Ventus Icon 1 KHBBS.png | Durgon Transporter | In the airlock leading to the Ship Exterior. Defeat the first wave of enemies that appear in the room, after which the Prize Pods will appear. If a second wave of enemies appears instead, exit and re-enter the room and try again. | ||
| File:DL Sprite Aqua Icon 1 KHBBS.png | Turo Prison Block | Far end of the hall. | ||
|
File:DL Sprite Terra Icon 1 KHBBS.png | Skull Rock: Entrance | Small cliff accessible via Air Slide from Skull Rock: Cavern. If Jellyshades and a Triple Wrecker appear, leave the area and come back. Repeat if necessary. | |
| File:DL Sprite Ventus Icon 1 KHBBS.png | Mermaid Lagoon | On the ledge accessible from the Cliff Path. A Wild Bruiser will appear alone first, followed by the Prize Pods and four Yellow Mustards. If the Wild Bruiser and Yellow Mustards appear together, exit the area and re-enter. | ||
| File:DL Sprite Aqua Icon 1 KHBBS.png | Indian Camp | Far end of the area. Appears alongside a Wild Bruiser. | ||
|
File:DL Sprite Terra Icon 1 KHBBS.png File:DL Sprite Ventus Icon 1 KHBBS.png File:DL Sprite Aqua Icon 1 KHBBS.png |
Risky Riches | The Prize Pots appear in the second-to-last wave of Round Three; eight appear this time. | |
| Treasure Tussle | Clear Round One and Round Two, and the first two waves of Round Three; the Prize Pots will appear on the bottom floor. |
Strategy
Prize Pods appear in exactly one location in nearly every world (usually a different location per character) and in certain matches in the Mirage Arena. They usually appear in groups of four, and will flee after thirty seconds without ever attacking. If they do not appear when the player character fulfills their appearance conditions, then the player can simply leave the room and try again, but once they appear in a world they will not reappear until the player leaves to the Lanes Between and then comes back. For every hit, they will drop an ingredient for making ice cream, and fighting Prize Pods is the only way to acquire these ingredients. Prize Pods drop two to three specific ingredients per character per world, so in order to get all the ingredients the player must defeat each set of Prize Pods in every world they inhabit.
To effectively and easily yield the most amount of ingredients from Prize Pods, it is recommended to have a repeating deck of a Magnet-type spell and then two Thunder-type spells, as well as a projectile-type Shotlock. Upon their appearance, use Magnega and then the following Thundagas. This will activate the Thunderbolt Command Style, nulling Magnega, so it should be recast. At this point step back and use a Shotlock to its maximum number of lock-ons. Once they have either been defeated or have fled, go in and collect the dropped ingredients. Another combo only Aqua can use would be to use a Magnet-type spell while on the ground, then following up with Raging Storm for multiple hits while the Magnet-type spell runs its course.
| Unversed |
|---|
| Enemy Unversed |
Archraven | Axe Flapper | Blobmob | Blue Sea Salt | Bruiser | Buckle Bruiser | Chrono Twister | Flood | Glidewinder | Hareraiser | Jellyshade | Mandrake | Monotrucker | Prize Pod | Red Hot Chili | Scrapper | Shoegazer | Sonic Blaster | Spiderchest | Tank Toppler | Thornbite | Triple Wrecker | Vile Phial | Wild Bruiser | Yellow Mustard
Belly Balloon | Element Cluster | Flame Box | Floating Flora | Gluttonous Goo | Lone Runner | Ringer | Vitality Vial
|
| Boss Unversed |
Cursed Coach | Iron Imprisoner | Mad Treant | Metamorphosis | Mimic Master | Spirit of the Magic Mirror | Symphony Master | Trinity Armor | Vanitas Remnant | Wheel Master
|