Brawlamari
| Brawlamari | |||||||
|---|---|---|---|---|---|---|---|
|
| |||||||
| Japanese | イカゲソード | ||||||
| Rōmaji | Ikagesōdo | ||||||
| Translation | Ikagesword
| ||||||
| Type | Nightmare Dream Eater | ||||||
| Game | Kingdom Hearts 3D: Dream Drop Distance | ||||||
| |||||||
_KH3D.png)
_KH3D.png)
| Brawlamari
|
|---|
| Kingdom Hearts 3D: Dream Drop Distance |
| A six-armed arsenal with twin sword-acles, four laser-cles, and a million ways to use 'em. |
The Brawlamari is a Dream Eater that appears in Kingdom Hearts 3D: Dream Drop Distance. It serves as a boss during Sora's Dive to The Grid and Riku's Dive to the Country of the Musketeers.
Design[edit]
The Brawlamari's name is a portmanteau of "brawl" and "calamari". Its Japanese name is a portmanteau of ikageso (イカ下足), the Japanese word for squid tentacle, and "sword" (ソード sōdo).
Strategy[edit]
Side: Sora[edit]
Sora is the first to engage battle with this Dream Eater, which reflects on having a simpler battle with Brawlamari. It will start by using Sword Stab, followed by Rock Crush, and Laser Barrier. Missing the attack or not, the Brawlamari creates an opening, and Sora will be able to reach his weak spot, the flashing dots on its head. When destroying one of them, it regains consciousness and retreats.
After destroying one weak spot, it will use Squid Laser, followed by Wild Bullets, Sword Slash, and Laser Barrier again. Once again, wait for the opening and strike its weak spot.
Getting the Gold Diver rank involves destroying one weak spot per attempt, since it will retreat after one weak spot is gone. So at each try, you must focus on destroying one spot before it regains consciousness, using the first two attempts to kill it. Also, speeding up after defeating Brawlamari does help on getting to the Finish Line sooner, which multiplies your score even more depending on how fast you got there. Don't speed too much, however, or you won't get the stars.
Side: Riku[edit]
Riku's battle starts the same as Sora's, although the attacks have improved. It uses Laser Barrier more frequently. Like before, its weak spots become vulnerable after using Laser Barrier. However, once the two weak spots have been defeated, Brawlamari moves on to its second phase.
In the second phase, it starts using Diffusion Laser. Riku needs to hide behind the rocks that appear to avoid damage, as the laser covers the entire screen. After the attack, it will reveal four new weak spots. Once two of them have been destroyed, its attacks become more fierce. It starts using Sword Stab multiple times in a row, followed by Sword Slash. During Diffusion Laser, the rocks that provide shelter now move around, requiring Riku to keep moving as well.
It's a good idea to defeat the weak spots all at the same time. Since there's no need to defeat one per try, and it gets harder as you defeat each of them, it's better to try and destroy them as close to each other as possible.
| Technique | Element | Status | Power | Block? | ||
|---|---|---|---|---|---|---|
| Sword Stab (剣突き刺し Ken Tsukisashi) |
— | — | — | — | ||
| Charges its blade-like tentacles and thrusts them forward. | ||||||
| Starts with this attack against Sora. | ||||||
| Rock Crush (岩クラッシュ Iwa Kurasshu) |
— | — | — | — | ||
| Sucks in a large rock, breaks it, and sends the pieces flying. The pieces of rock can be attacked to obtain a HP prize for each. | ||||||
| Starts with this attack against Riku. | ||||||
| Laser Barrier (レーザーバリア Rēzā Baria) |
— | — | — | — | ||
| Fires a laser over a wide area. | ||||||
| For Riku's side, it is only used during the first phase. Can be avoided by using Aerial Brake to slow down. Causes the weak spots to be within range after evading. | ||||||
| Squid Laser (イカレーザー Ika Rēzā) |
— | — | — | — | ||
| Fires four lasers that move around. | ||||||
| Can be avoided by moving in a circular motion. | ||||||
| Wild Bullets (バラマキ弾 Baramaki-dan) |
— | — | — | — | ||
| Only used against Sora. Fires countless bullets. | ||||||
| The bullets can be avoided with Reflect Dodge. | ||||||
| Sword Slash (剣なぎ払い Ken Nagiharai) |
— | — | — | — | ||
| Sticks out its tentacles and sweeps them across the screen. | ||||||
| Used after a Sword Stab. | ||||||
| Diffusion Laser (拡散レーザー Kakusan Rēzā) |
— | — | — | — | ||
| Only used against Riku during the second phase. Charges energy, then fire a laser across the entire screen. Floating rocks provide cover from the laser. When 2 or fewer weak spots are left, the rocks will move. | ||||||
| The weak spots become targettable after evading this attack. Referred to as "super-laser" in-game. | ||||||
| Guard/Block: △ = Can be blocked; O = Can be blocked and interrupted (melee) or deflected back (projectile); X = Cannot be blocked. | ||||||
Gallery[edit]
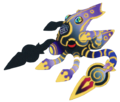
Concept art of the Brawlamari on Sora's side.
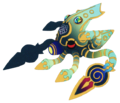
Concept art of the Brawlamari on Riku's side.
_(Art).png)
_(Art).png)
Videos[edit]
| Brawlamari (Sora) (Kingdom Hearts Dream Drop Distance HD) | Brawlamari (Riku) (Kingdom Hearts Dream Drop Distance HD) |
|---|---|