Gallery:The Final World: Difference between revisions
From the Kingdom Hearts Wiki, the Kingdom Hearts encyclopedia
Jump to navigationJump to search
m (Text replacement - "$" to "$1 Category:Galleries") |
|||
| (5 intermediate revisions by 4 users not shown) | |||
| Line 1: | Line 1: | ||
{{Suite}} | {{Suite}} | ||
==''Kingdom Hearts III''== | ==''Kingdom Hearts III''== | ||
===World icons=== | |||
<gallery> | |||
File:The Final World Logo KHIII.png|The Final World logo in ''Kingdom Hearts III'' | |||
</gallery> | |||
===Location images=== | |||
<gallery> | <gallery> | ||
File:The Final World 1 KHIII.png|The Final World. | File:The Final World 1 KHIII.png|The Final World. | ||
File:The Final World 2 KHIII.png|The crystalline structure. | File:The Final World 2 KHIII.png|The crystalline structure. | ||
</gallery> | |||
===Screenshots=== | |||
<gallery> | |||
File:I'll Wait 01 KHIII.png|Sora meets Chirithy in The Final World. | |||
File:Sora Talks to Nameless Star KHIII.png|Sora talks to a Nameless Star about the person she is waiting for. | |||
</gallery> | </gallery> | ||
==''Kingdom Hearts III Re Mind''== | ==''Kingdom Hearts III Re Mind''== | ||
===Screenshots=== | |||
<gallery> | <gallery> | ||
File:The Final World 3 KHIIIRM.png|The Final World at night. | File:The Final World 3 KHIIIRM.png|The Final World at night. | ||
</gallery> | </gallery> | ||
==''Kingdom Hearts Melody of Memory''== | ==''Kingdom Hearts Melody of Memory''== | ||
===Track Plate=== | |||
<gallery> | <gallery> | ||
File:Track Plate (The Final World) FW KHMOM.png|Track Plate | File:Track Plate (The Final World) FW KHMOM.png|Track Plate | ||
</gallery> | |||
===Location images=== | |||
<gallery> | |||
File:The Final World KHMOM.png|The Final World | |||
File:The Final World 02 KHMOM.png|The Final World | |||
</gallery> | |||
==Artwork== | |||
<gallery> | |||
File:The Final World (Art).png|The Final World. | |||
</gallery> | </gallery> | ||
[[Category:Galleries]] | [[Category:Galleries]] | ||
Latest revision as of 18:51, 20 December 2023
Kingdom Hearts III[edit]
World icons[edit]

The Final World logo in Kingdom Hearts III
Location images[edit]

The Final World.
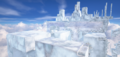
The crystalline structure.


Screenshots[edit]

Sora meets Chirithy in The Final World.

Sora talks to a Nameless Star about the person she is waiting for.


Kingdom Hearts III Re Mind[edit]
Screenshots[edit]
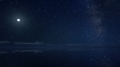
The Final World at night.

Kingdom Hearts Melody of Memory[edit]
Track Plate[edit]

Track Plate
_FW_KHMOM.png)
Location images[edit]

The Final World

The Final World


Artwork[edit]

The Final World.
.png)