Sniperwild: Difference between revisions
Lady Junky (talk | contribs) No edit summary |
Freddy1993 (talk | contribs) |
||
| (41 intermediate revisions by 24 users not shown) | |||
| Line 1: | Line 1: | ||
{{game|FM1}} | |||
{{game|FM1 | {{Character | ||
{{ | |||
|name=Sniperwild | |name=Sniperwild | ||
|katakana=スナイパーワイルド | |katakana=スナイパーワイルド | ||
|romaji= | |romaji=Sunaipāwairudo | ||
|fr=Primate patrouilleur | |||
|fr=Primate patrouilleur | |de=Anthropuzina | ||
|de= | |image=[[File:Sniperwild KHFM.png|200px]] | ||
|image=[[File: | |||
|game1=Kingdom Hearts Final Mix | |game1=Kingdom Hearts Final Mix | ||
|type=Emblem Heartless | |type=Emblem Heartless | ||
| Line 14: | Line 12: | ||
|s1=Bouncywild | |s1=Bouncywild | ||
|s2=Powerwild | |s2=Powerwild | ||
|s3=Cheery Ape | |||
|s4=Wild Shaman | |||
|journalKH=A Heartless resembling a monkey. It roams as it pleases, rarely paying attention to its surroundings.<br><br>If Sora is spotted, it will call forth numerous allies, all armed with slingshots. | |journalKH=A Heartless resembling a monkey. It roams as it pleases, rarely paying attention to its surroundings.<br><br>If Sora is spotted, it will call forth numerous allies, all armed with slingshots. | ||
|KHHP1=28 | |KHHP1=28 | ||
| Line 23: | Line 23: | ||
|KHMP1=20 | |KHMP1=20 | ||
|KHMP2=49 | |KHMP2=49 | ||
|KHEXP1= | |KHEXP1=<ref>1 Tech Point for first Sniperwild defeated, 2 Tech Points for second defeated, etc.</ref> | ||
|KHEXP2= | |KHEXP2=<ref>10 Tech Points for first Sniperwild defeated, 20 Tech Points for second defeated, etc.</ref> | ||
|KHweapon=x1.0 | |KHweapon=x1.0 | ||
|KHfire=x0.49 | |KHfire=x0.49 | ||
|KHbliz=x0.5 | |KHbliz=x0.5 | ||
|KHthun= | |KHthun=x0.5 | ||
|KHgrav=x0.04<ref>x0.03 after rescue</ref> | |KHgrav=x0.04<ref>x0.03 after rescue</ref> | ||
|KHstop=x0.3<ref>x0.2 after rescue.</ref> | |KHstop=x0.3<ref>x0.2 after rescue.</ref> | ||
|KHko=x0.5 | |KHko=x0.5 | ||
|KHother=x0.5 | |KHother=x0.5 | ||
|KHreward=''' | |KHreward='''Sniperwild trips over a banana peel'''<br>(1) Munny x20, Ether (20%)<br><br>'''Defeat 1st-5th Sniperwild'''<br>(1) HP prize x3<br><br>'''Defeat 6th Sniperwild'''<br>(1) HP prize x9, (1) Munny x20, Potion (100%), Power Stone (35%)<br><br>'''Defeat 7th-11th Sniperwild'''<br>(2) MP prize x3<br><br>'''Defeat 12th Sniperwild'''<br>(2) MP prize x9, (1) Munny x25, Tent (100%), Power Stone (50%)<br><br>'''Defeat 13th-17th Sniperwild'''<br>(5) HP prize x1<br><br>'''Defeat 18th Sniperwild'''<br>(5) HP prize x3, (1) Munny x25, (20) Munny x1, Hi-Potion (100%), Power Stone (60%)<br><br>'''Defeat 19th-23rd Sniperwild'''<br>(15) MP prize x1<br><br>'''Defeat 24th Sniperwild'''<br>(15) MP prize x3, (1) Munny x25, (20) Munny x2, Camping Set (100%), Power Stone (100%)<br><br>'''Defeat 25th-29th Sniperwild'''<br>(1) Munny x5<br><br>'''Defeat 30th Sniperwild'''<br>(1) Munny x35, (20) Munny x3, Power Stone (100%), Power Stone (100%) | ||
|KHworld=Traverse Town | |KHworld=Traverse Town | ||
}} | }} | ||
The '''Sniperwild''' is an | The '''Sniperwild''' is an [[Emblem Heartless]] that is found in ''[[Kingdom Hearts Final Mix]]''. The Sniperwild only appears as a special encounter in the {{c|Second District|trt}}. | ||
==Design== | ==Design== | ||
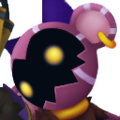
A Sniperwild is a feminine, monkey-like Heartless with predominantly magenta fur. Its fur is covered by white stripes, the fur on its torso is brown, and the fur on its hands and feet is black. It wears brown and tan bracelets and armlets, a gold choker, two gold hoop earrings, and a violet bow. Its face is pitch-black and its eyes are glowing yellow. The Sniperwild carries a small slingshot as a weapon and its Heartless emblem is emblazoned on its chest. | A Sniperwild is a feminine, monkey-like [[Heartless]] with predominantly magenta fur. Its fur is covered by white stripes, the fur on its torso is brown, and the fur on its hands and feet is black. It wears brown and tan bracelets and armlets, a gold choker, two gold hoop earrings, and a violet bow. Its face is pitch-black and its eyes are glowing yellow. The Sniperwild carries a small slingshot as a weapon and its Heartless emblem is emblazoned on its chest. | ||
The former part of the Sniperwild's name highlights its weapon, a slingshot capable of hitting enemies from a distance. Other Heartless of its family share the latter part of the name, signifying that they are of the same species. It also refers to the Heartless's wild, monkey-like appearance. | The former part of the Sniperwild's name highlights its weapon, a slingshot capable of hitting enemies from a distance. Other Heartless of its family share the latter part of the name, signifying that they are of the same species. It also refers to the Heartless's wild, monkey-like appearance. | ||
==Strategy== | ==Strategy== | ||
Sniperwilds appear in waves, starting with one Sniperwild, then two, then three, and then starting over again at one. This continues until five cycles have been completed, or reinforcements are called in. | |||
Sniperwilds will hop around the room, searching for [[Sora]] with their glowing eyes. If he is spotted, the Sniperwild will start raising the alarm, and if allowed to finish, an endless stream of Sniperwilds will begin appearing and hitting the [[party]] with unblockable shots. Although the Sniperwilds can still be slain at this point, they will no longer drop [[items]] or [[experience]] and are very likely to knock out the entire party, so Sora should just leave the area and start over. | |||
In order to avoid this, Sora can either attempt to ambush a Sniperwild from behind and slay it before it can put out an alarm, or use a [[Stop]] spell to the same effect. As more Sniperwilds are defeated, the experience gained for each one will increase from 10, to 20, to 30, and so on, and they will be more likely to drop a [[Power Stone]]. | |||
The easiest strategy is to equip a Keyblade specializing in strength like [[Olympia]], [[Pumpkinhead]], and [[Ultima Weapon]] and hide behind the arch above the fountain near the gate between the Second District and the First District. When a Sniperwild hops to a higher place like the sidewalk near the Hotel or near the shops across the hotel, use [[Glide]] or [[Superglide]] to reach the Sniperwild, defeat it quickly, Glide back to the arch, and repeat the process. Sometimes, the Sniperwilds can spot Sora if he is not directly in the middle, so he must hide right in the middle of the arch so that the Sniperwilds will never spot him. | |||
Another solid strategy is to equip all three [[Cheer]] abilities and the necessary equipment to maximize Sora's [[MP]] and [[summon]] power, and summon [[Mushu]]. Mushu's Fire Breath at a high enough MP level is able to shred through a single target one by one so long as Sora alternates properly between targets while keeping enough distance. Should Mushu's time be used up, Sora can just head to a safe place far away, run back in close enough and re-summon Mushu to repeat the process. | |||
==Gallery== | |||
<gallery> | |||
Sniperwild (Portrait) KHFM.png|Sniperwild's journal portrait in ''Kingdom Hearts Final Mix''. | |||
Sniperwild (Portrait) KHHD.png|Sniperwild's journal portrait in ''Kingdom Hearts HD 1.5 ReMIX''. | |||
</gallery> | |||
==Notes and references== | |||
{{reflist}} | |||
{{FM1}} | {{FM1}} | ||
{{HeartlessDirectory}} | {{HeartlessDirectory}} | ||
[[Category:Kingdom Hearts Final Mix enemies]] | |||
Latest revision as of 00:28, 15 March 2024
| Sniperwild | |||
|---|---|---|---|
|
| |||
| Japanese | スナイパーワイルド | ||
| Rōmaji | Sunaipāwairudo
| ||
| Type | Emblem Heartless | ||
| Game | Kingdom Hearts Final Mix | ||
| |||

| Sniperwild
|
|---|
| Kingdom Hearts |
| A Heartless resembling a monkey. It roams as it pleases, rarely paying attention to its surroundings. If Sora is spotted, it will call forth numerous allies, all armed with slingshots. |
| HP | STR | DEF | MP rec | EXP | |||
| Before rescue | 28 | 15 | 13 | 20 | [1] | ||
| After rescue | 90 | 35 | 27 | 49 | [2] | ||
| Weapon | Fire | Blizzard | Thunder | ||||
| x1.0 | x0.49 | x0.5 | x0.5 | ||||
| Percentage | Stop | Stun | Other | ||||
| x0.04[3] | x0.3[4] | x0.5 | x0.5 | ||||
| Rewards | |||||||
| Sniperwild trips over a banana peel (1) Munny x20, Ether (20%) Defeat 1st-5th Sniperwild (1) HP prize x3 Defeat 6th Sniperwild (1) HP prize x9, (1) Munny x20, Potion (100%), Power Stone (35%) Defeat 7th-11th Sniperwild (2) MP prize x3 Defeat 12th Sniperwild (2) MP prize x9, (1) Munny x25, Tent (100%), Power Stone (50%) Defeat 13th-17th Sniperwild (5) HP prize x1 Defeat 18th Sniperwild (5) HP prize x3, (1) Munny x25, (20) Munny x1, Hi-Potion (100%), Power Stone (60%) Defeat 19th-23rd Sniperwild (15) MP prize x1 Defeat 24th Sniperwild (15) MP prize x3, (1) Munny x25, (20) Munny x2, Camping Set (100%), Power Stone (100%) Defeat 25th-29th Sniperwild (1) Munny x5 Defeat 30th Sniperwild (1) Munny x35, (20) Munny x3, Power Stone (100%), Power Stone (100%) | |||||||
| World(s) | |||||||
| Traverse Town | |||||||
The Sniperwild is an Emblem Heartless that is found in Kingdom Hearts Final Mix. The Sniperwild only appears as a special encounter in the Second District.
Design[edit]
A Sniperwild is a feminine, monkey-like Heartless with predominantly magenta fur. Its fur is covered by white stripes, the fur on its torso is brown, and the fur on its hands and feet is black. It wears brown and tan bracelets and armlets, a gold choker, two gold hoop earrings, and a violet bow. Its face is pitch-black and its eyes are glowing yellow. The Sniperwild carries a small slingshot as a weapon and its Heartless emblem is emblazoned on its chest.
The former part of the Sniperwild's name highlights its weapon, a slingshot capable of hitting enemies from a distance. Other Heartless of its family share the latter part of the name, signifying that they are of the same species. It also refers to the Heartless's wild, monkey-like appearance.
Strategy[edit]
Sniperwilds appear in waves, starting with one Sniperwild, then two, then three, and then starting over again at one. This continues until five cycles have been completed, or reinforcements are called in.
Sniperwilds will hop around the room, searching for Sora with their glowing eyes. If he is spotted, the Sniperwild will start raising the alarm, and if allowed to finish, an endless stream of Sniperwilds will begin appearing and hitting the party with unblockable shots. Although the Sniperwilds can still be slain at this point, they will no longer drop items or experience and are very likely to knock out the entire party, so Sora should just leave the area and start over.
In order to avoid this, Sora can either attempt to ambush a Sniperwild from behind and slay it before it can put out an alarm, or use a Stop spell to the same effect. As more Sniperwilds are defeated, the experience gained for each one will increase from 10, to 20, to 30, and so on, and they will be more likely to drop a Power Stone.
The easiest strategy is to equip a Keyblade specializing in strength like Olympia, Pumpkinhead, and Ultima Weapon and hide behind the arch above the fountain near the gate between the Second District and the First District. When a Sniperwild hops to a higher place like the sidewalk near the Hotel or near the shops across the hotel, use Glide or Superglide to reach the Sniperwild, defeat it quickly, Glide back to the arch, and repeat the process. Sometimes, the Sniperwilds can spot Sora if he is not directly in the middle, so he must hide right in the middle of the arch so that the Sniperwilds will never spot him.
Another solid strategy is to equip all three Cheer abilities and the necessary equipment to maximize Sora's MP and summon power, and summon Mushu. Mushu's Fire Breath at a high enough MP level is able to shred through a single target one by one so long as Sora alternates properly between targets while keeping enough distance. Should Mushu's time be used up, Sora can just head to a safe place far away, run back in close enough and re-summon Mushu to repeat the process.
Gallery[edit]

Sniperwild's journal portrait in Kingdom Hearts Final Mix.
Sniperwild's journal portrait in Kingdom Hearts HD 1.5 ReMIX.
_KHFM.png)
_KHHD.png)
Notes and references[edit]
| Kingdom Hearts Final Mix |
|---|
| Additional enemies |
| Bosses |
| Arch Behemoth - Destroyed Behemoth - Red Armor - Sneak Army - Unknown |
| Enemy Heartless |
| Black Ballade - Chimera - Gigas Shadow - Grand Ghost - Jet Balloon - Missile Diver - Neoshadow - Stealth Soldier - Pot Scorpion - Pink Agaricus - Sniperwild |
| Additional weapons |
| Diamond Dust - One-Winged Angel - Fantasista - Meteor Strike - Mighty Shield - Seven Elements |
| Additional music |
| Kingdom Hearts Final Mix - Additional Tracks - Kingdom Hearts Original Soundtrack Complete |
| Archives |
| Additional accessories - Additional abilities - Another side, another story... [deep dive] - Artwork - Enemy renders |